Shopify
Overview
Follow the steps in this guide to integrate Zip into your Shopify store.
If you have any questions or need any support integrating, please email us.
Add The Payment Gateway
After successfully setting up Zip Connect (powered by Stripe) for your Zip account, you can add Zip as a payment option in your Shopify store.
- Install our Shopify Payments app, Zip (US):
- Click Install app to finish the installation.
- Click Connect to enable Zip (US).
- Click Install app to finish the installation.
Questions?
If you have have any questions, or encounter any issues when installing the app, please contact us at [email protected].
Widget Overview
What is the Zip Widget?
The Zip Widget is a visual price breakdown that appears on the product page, cart, and mini cart.
It is an easy way for your customers to understand Zip's benefits, how it works, and help inspire them to checkout. Our merchant partners with the Zip Widget on their product pages have shown that the widget can increase Conversion rate and Topline sales by more than 20%!
Read more here: Messaging & Widgets Overview
How do I Integrate the Widget?
To get the widget integrated in your Shopify store, please follow the Zip Widget App instructions.
If you require further customization, you can implement Zip's Classic Widget instructions.
Zip Widget App
The Zip Widget App is a quick and easy way to install the Zip Widget on your Shopify store. Follow the instructions below to add the widget app and customize it for your store.
First, please check you are using one of the compatible Shopify Themes here.
How to Install the Zip Widget App
1. Navigate to the widget app in Shopify's app store
- Click 'Install'
- Click 'Install'
- Select your region, enter in your Merchant Id, and click 'Save settings.'
Note: Make sure to select the correct region that matches your Shopify store currency.
- Once you have selected your region, click 'Integrate Widget.'
- Then click 'Customize widget.'
- Now, select where you would like the widget to appear in the 'Widget' tab.
- Once you have selected your preferred Zip widget settings, click 'Save.'
Congratulations — well done!
View the theme you just worked on. If the widget was integrated properly, it should appear in your product page, mini cart, and cart. If it doesn't, you will need to integrate via Classic Widget instructions.
If you have any questions or are encountering any difficulties, please contact us at [email protected].
Integrate with the Classic Widget
Before You Start
These instructions are for a Shopify store using one of the default Shopify or lightly customized themes. If the store's theme is heavily customized, you may have to add the below snippets to different templates and files.
For additional integration support: email us
Add Widget to PDP
- Login to your Shopify store.
- In the left menu, click Online Store
- For the theme you would like to edit, expand the Actions menu and choose Edit Code.
We recommend adding the Zip widget to a development theme or a copy of the currently live theme. This way you can control when you share the integration with your customers.
- In the Layout menu to the left, open theme.liquid.
- In the theme.liquid file, before the closing
</body>
tag, insert this script which calls the Zip informational modal from each widget:
<!-- zip.js Library -->
<script src="https://cdn.us.zip.co/v1/zip.js"></script>
Then Click Save.
- Locate the Product Details Page template. Often this is in the Sections folder in the file product-template.liquid file. (If your theme is customized, the Product Details Page template may be in another file.) Inside the Product Details Page template, locate where the price is displayed. Then, right below the Product Price, paste in this snippet. Click Save.
<!-- Insert Zip Widget -->
<zip-widget-v3 amount={{ current_variant.price | divided_by: 100.00 }}></zip-widget-v3>
- Note the variable that is used to display the price. Paste this same price variable after
amount=
in the above snippet. Shopify uses a variety of variables to indicate the product price, including:
Current_variant.price
Variant.price
Product.price
Product.selected_or_first_available_variant.price
- If the price is displayed with a JavaScript variable, you may need to wrap the price variable in raw tags as follows:
{% raw %} {{{totalQPPrice}}} {% endraw %}
Note: If the above snippet always shows "4 payments on orders over ${min price}
even when the price is above the minimum allowed price, the price variable after amount=
needs to be replaced.
- Click the Preview link in the top menu to preview the Zip Widget in this theme.
Customizing the Styling of the Zip Widget
For guidance on customizing the styling of the widget, visit the Zip Widget Integration Guide.
Add Widget to Cart
After you have added the widget to the Product Details Page template, add the widget to the Cart template.
- Locate the Cart template. Often this is in the Sections folder in the file cart-template.liquid file. (If your theme is customized, the Cart template may be in another file.) Inside the Cart template, locate where the price is displayed. Then, right below the Cart Subtotal or Cart Total, paste in this snippet. Click Save.
<!-- Insert Zip Widget -->
<quadpay-widget-v3 amount={{ cart.total_price | divided_by: 100.00 }} merchantId="[Insert merchant Id]" ></quadpay-widget-v3>
-
Note the variable that is used to display the cart total. Paste this same cart total variable after
amount=
in the above snippet. Shopify uses various variables to indicate the cart total, but typically the cart total variable is:cart.total_price
Note: If the above snippet always shows "4 interest-free payments on orders over${min price}
even when the price is above the minimum allowed price, the cart total variable afteramount=
needs to be updated. -
Click the Preview link in the top menu to preview the Zip Widget in this theme.
Customizing the Styling of the Zip Widget
For guidance on customizing the styling of the widget, visit the Zip Widget Integration Guide.
Add Widget to Mini Cart
If your site uses a Mini Cart, after you add the widget to the Product Details Page and Cart templates, add the widget to the Mini Cart.
- Locate the Mini Cart template. Often this is handled in the Layout/theme.liquid file, but the mini cart is also frequently handled through separate JavaScript files in the Assets folder. Inside the Mini Cart file, locate where the price is displayed. Then, right below the Cart Subtotal or Cart Total, paste in this snippet. Click Save.
<!-- Insert Zip Widget -->
<quadpay-widget-v3 amount={{ cart.total_price | divided_by: 100.00 }} merchantId="[Insert merchant Id]" ></quadpay-widget-v3>
-
Note the variable that is used to display the mini cart total. Paste this same variable after
amount=
in the above snippet. Shopify uses various variables to indicate the cart total in the mini cart, but often the mini cart total variable is:cart.total_price
or{{{totalPrice}}}
Note: If the above snippet always shows "4 interest-free payments on orders over${min price}
even when the price is above the minimum allowed price, the cart total variable afteramount=
needs to be updated. -
Click the Preview link in the top menu to preview the Zip Widget in this theme.
Sometimes, the Mini Cart is already quite customized and integrating the Zip widget requires additional customizing. If you would like support with adding the widget to the Mini Cart or for any questions please get in touch with us.
Manually Uninstalling the Shopify Widget
If you're upgrading from our legacy Shopify Messaging app to our new Shopify Messaging app, you'll need to manually uninstall the old app.
-
Navigate to Sales Channels > Online Store > Themes
-
Click the ••• icon to the left of the theme Customize button. Then select 'Edit code'
-
In the code editor, search for 'zip' (lowercase) and locate the zip-widget.liquid file under the Snippets folder.
-
Select the trash can icon next to the zip-widget.liquid file and confirm the file deletion.
-
The deletion is now complete. You can now either uninstall the Zip On-site Messaging app if you no longer wish to display the Zip placements or you can return to the app Dashboard to start the installation process of the new app.
Issuing Refunds
Issuing refunds for Zip orders is straightforward with the following instructions.
- Locate the Zip order you would like to issue a refund for.
- Click Refund on the Order Details Page.
- Enter the Refund Amount and Reason.
- Click the Refund button. Zip will automatically credit the customer's existing and/or future installments as needed.
- Verify the order status both in both Shopify and also in the Zip Merchant Portal (staging environment).
If the online store doesn't handle issuing refunds directly, the Zip Merchant Portal can be configured to issue refunds. Contact [email protected] to learn more.
Matching Zip and Shopify Orders
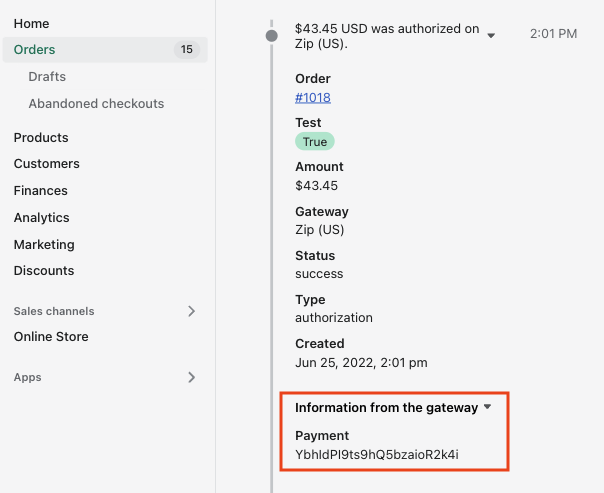
When an order is placed through Shopify, there is an Id called the Payment Id set on the order. You can find this Id in Shopify, in the order Timeline section. Navigate to the Timeline event that says "A $X USD payment was authorized on Zip (US)," then expand the "Information from the gateway" section to reveal the Payment Id.
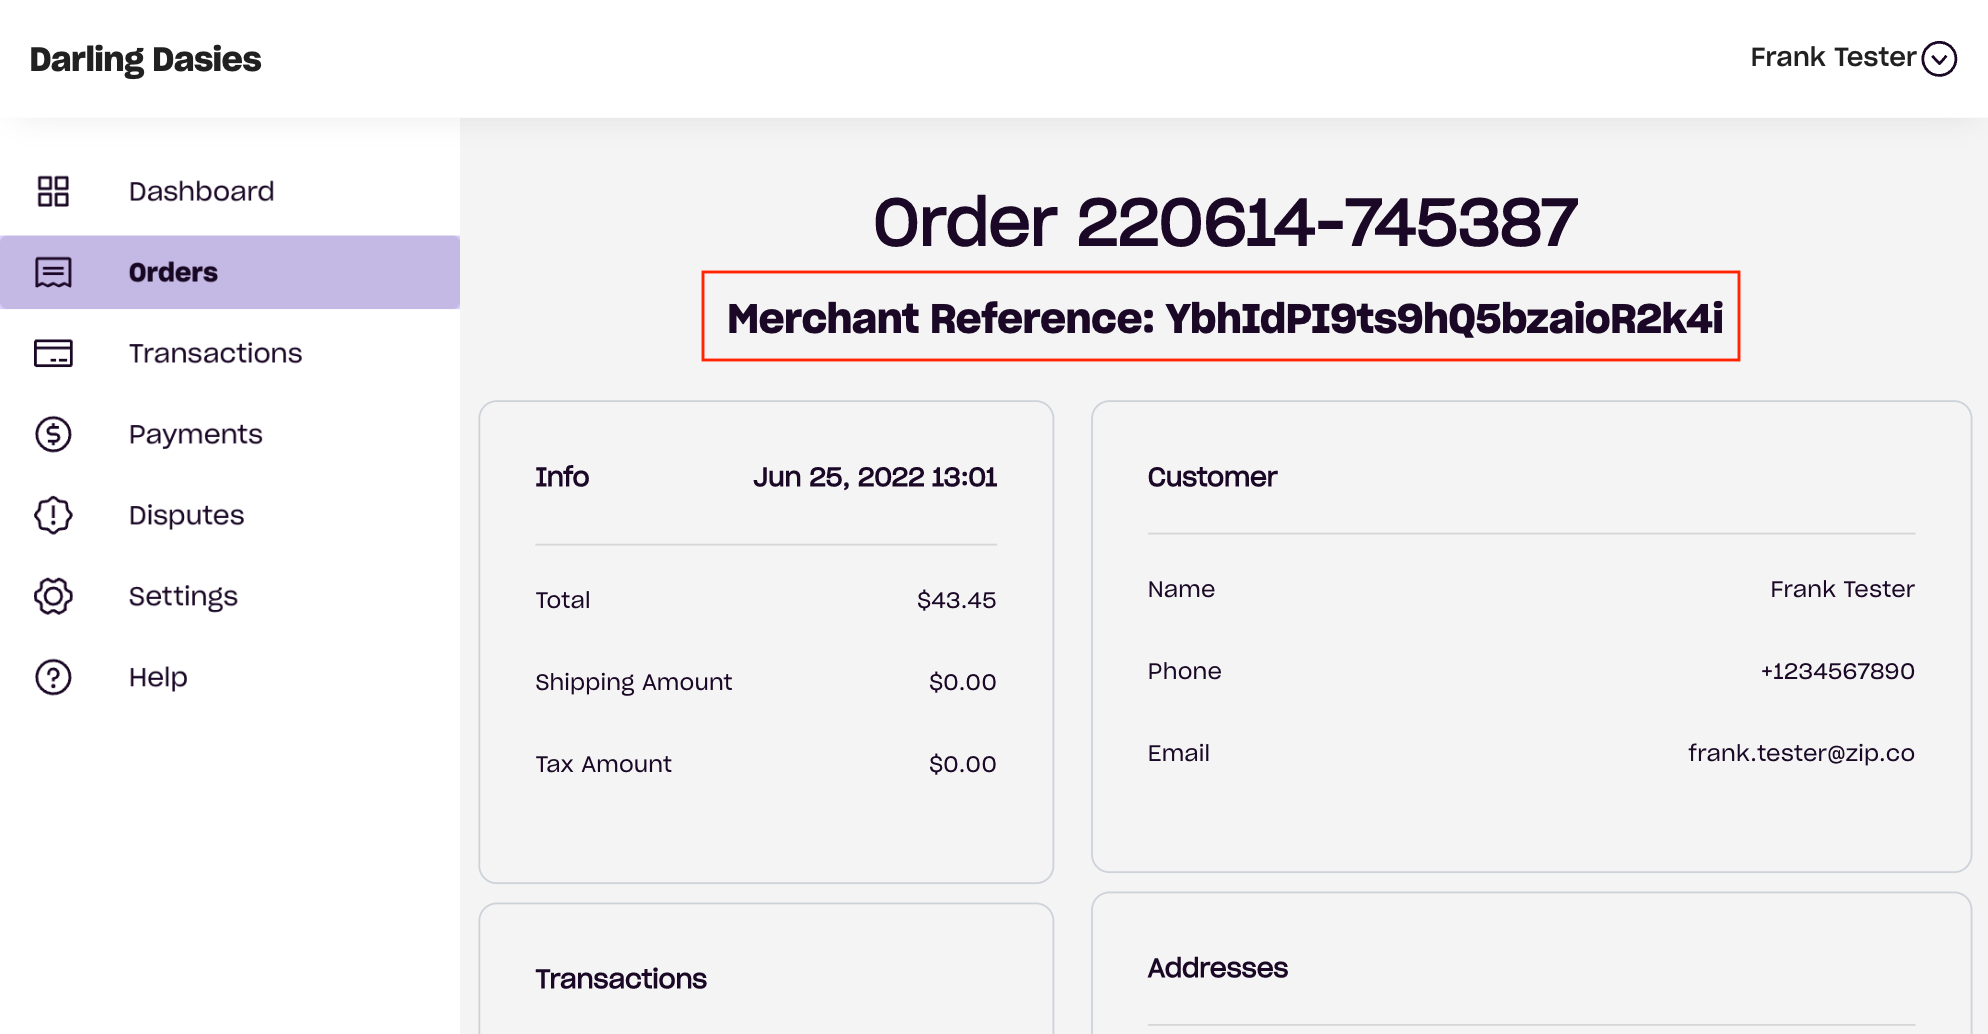
You will find this Payment Id in your Zip Merchant Portal in the Merchant Reference field.
Note
Shopify does not provide Zip with the Shopify Order Id. You will need the Shopify Payment Id in order to associate Shopify and Zip orders.
Find Orders in Shopify with a Zip Order Number
-
To find the corresponding Shopify order from a Zip order, find the Payment Id in the Merchant Reference field in the Zip Merchant Portal or via the Zip Reporting API.
-
From your Shopify admin, go to Orders.
-
Search using the custom term receipt.payment_id: and the Payment Id value.
For example: receipt.payment_id:xxx.
-
Click on the order.
-
To verify the gateway and payment information, click on the specific event in the Shopify order Timeline. For more information, refer to View payment events from the Timeline.
Reconcile Zip and Shopify Orders
When you need to reconcile a large number of orders between Zip and Shopify, you can use the Payment Id to do so.
-
From your Shopify admin, go to Orders.
-
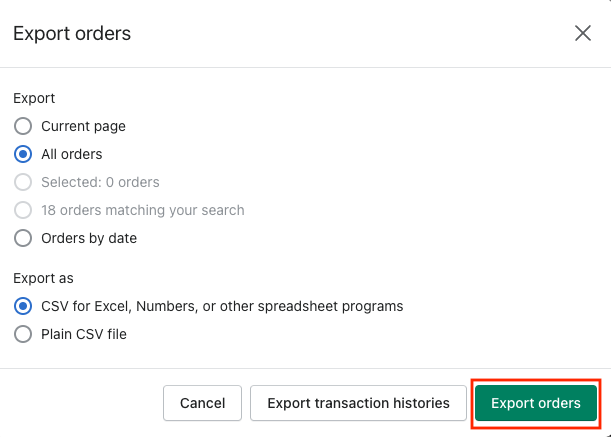
Click Export, choose the order range to export and click Export orders
-
In the Zip Merchant Portal or Reporting API, download the selection of transactions to reconcile.
-
Match the Payment Id from the Shopify order export to the Merchant Reference value in the Zip export.
Updated 3 months ago